
Video
Watch this tutorial on YouTube:
Overview
I’m going to show you how to preserve UV maps when moving model geometry in Blender. You can use this technique to quickly adjust already modeled and textured 3d meshes, without touching any UV maps or textures.
Practical Use Case
First, a practical example. I have this simple 3d model which is fully textured in a beautiful pixel art style:

This is for a game I’m working on right now, called Rascals & Railways. I’ve got this piece from a 3D artist (shoutout to pixelhans) who’s working with me on the game – and my goal is to import it into a game engine, in this case Unity. For this tip though the engine doesn’t really matter, it could also be Unreal Engine, Godot or any 3D engine really.
So while I’ve reviewed this model in Blender I’ve noticed that the bottom part is actually geometry that will never be seen by the player. The player will only ever see the front of the wall and will never see the back portion of this floor:

While this is a very simple mesh and it probably wouldn’t matter, in the game I’m developing hundreds of these meshes will be instantiated at run-time, to create a dungeon-like environment. So things like these can and do add up, especially over the lifetime of a project! Keep things tidy now to avoid problems later on is a good general rule to follow when it comes to game development.
One thing I could do is to directly move vertices and merge them with others to reduce the polygon count and we’re good to go, right? Well, no – because what we’ve now did is squashing the texture here – That’s not something that we want.

The Problem
To better illustrate what I’m talking about, I have prepared a simple plane with a test texture applied. This is done using the Texel Density Checker Add-On. What it does is that it actually applies a test material that you can use to check your UV maps for issues such as stretched textures, mismatched texel density and similar problems.
As we can see in the gif below, when modifying geometry of a mesh in edit mode (via the grab tool, by pressing the g key), such as moving a vertex, the mapped texture is stretched along with it.

The Solution(s)
Vertex/Edge Slide
In edit mode, select a vertex or edge and press gg (double tap the g key) to activate the Vertex Slide or Edge Slide tool. Alternatively press Shift-V to activate the Vertex Slide tool directly. Then press LMB to confirm the transformation.
This option uses the constrains of the mesh and moves the vertex along it’s connected edges and at same time preserves UVs!
This works because of a “Correct UVs” option that is automatically applied when using the Vertex/Edge Slide tool (since Blender v2.8+). After you’ve confirmed the transformation, an options shelf appears where you can toggle said option:

Correct Face Attribute
An alternative solution is to enter Edit Mode and tick the “Correct Face Attribute” option in the Active Tool shelf (press n to make it appear):

Alternatively it’s found in the Properties editor on the bottom right, in the Active Tool and Workspace Settings tab:
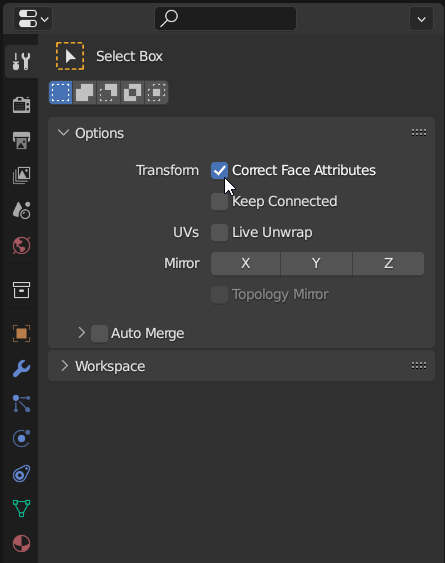
Enabling this will make blender automatically correct UVs as you modify a mesh:

There you have it – two ways of preserving UVs when modifying a mesh!